

On a budget: lemon pancake bars

“On a Budget” is your go-to source for easy, wholesome and tasty recipes adapted for maximum health and minimum cost. Tune in for a variety of food that’s as good for your wallet as it is for your body.
I improvised a lot in this recipe, and the results were completely different from what they should have been. I was trying to make lemon bars. I had already turned the oven on and gotten my ingredients out, except for the gluten-free flour. I thought I still had some gluten-free flour in my kitchen, but all I had was Bisquick. The college chef in me said “Bisquick has flour in it, so you can use that in place of flour.”
That one decision completely changed my recipe. Were the lemon bars any less delicious? No. Were the lemon bars different than any lemon bars I had ever had before? Yes, hence why this recipe is called “lemon pancake bars.” The good news is that when I gave them to my friends, they ate half of the pan in one hour and said they liked the less sticky texture and more subtle flavor of my lemon bars. This recipe will definitely make it into my stack of unusual recipe cards.
As a side note, I was so flustered and unsure of how the lemon bars were going to turn out that I didn’t take many pictures as I was preparing them. If they look weird, you’re probably doing it right! This recipe was adapted from the one found here.
Start to Finish: 1 hour (10 minutes active)
Servings: 24 bars
Difficulty level: Low
Effort required: Low
Price point: Low
Good for: A light midnight snack, something sweet and sour, when life gives you lemons
Ingredients
Crust
- 2 ¼ cups gluten-free Bisquick
- ½ cup sugar
- 1 teaspoon salt
- 1 teaspoon vanilla extract
- 8 tablespoons melted butter
Filling
- 4 eggs
- 1 2/3 cups honey
- ¼ cup gluten-free Bisquick
- 2/3 cup lemon juice
- 1/3 cup almond milk
Directions
- Preheat the oven to 350° Line a baking pan with tin foil.
- Pour dry crust ingredients into a mixing bowl and whisk together until thoroughly blended. Add the vanilla extract and half of the melted butter. Whisk until blended. Add the rest of the butter and whisk together until the mixture is crumbly.
- Dump the mixture into the baking pan and press the crust down to make one even layer. Bake for 20 minutes.
- Place the filling ingredients in another bowl and whisk until the ingredients are fully incorporated together.
- Pour the filling over the baked crust. Bake for 30 minutes or until the filling is set. It should look like a thin layer of cake.
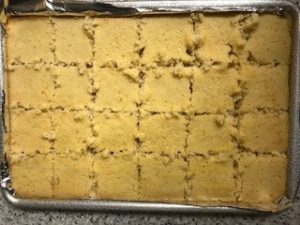
- Let cool for 3-4 minutes, serve and enjoy!


Customessaywriting • Apr 2, 2018 at 11:54 am
I love how your dad cut your pancakes so perfectly! We used Bisquick when we were kids, too, but I like your oat pancakes much better Happy Thanksgiving!